
Notice:This archived article is most ideal if you are using CorelDRAW 9 or 10. Version 8 should still be similar enough to make the information useful, but version 9 had significant advancements. If you are using CorelDRAW 11, 12, X3, or higher, my updated version of this article will be much better for you. |
If you ever have a graphic that plagues you with file sharing problems, this article will lay out some strategies for combating the situation. As a bonus, you will learn successful design principles that work well for many reproduction techniques; sign production would be a good example, and that is something often overlooked in graphic design.
In Part 3 of this series, we looked at some very common problems in file sharing and I promised we would continue with that, and look at even more ways that Wireframe will make your life easier. Wireframe is still an integral part of determining a good design from one that will merely get you by. It allows you to troubleshoot a junk file that you inherited the responsibility to fix. At the same time, you can use it to reduce the chance of being haunted later by files you should have done right the in first place.
I have dedicated plenty of emphasis to principles, probably more so than mechanics, and this subject will be no different. Last time I mentioned that the more a graphic looks the same in Wireframe as it does in Normal view, the better off you will be. We are going to build on that principle.
If a graphic is properly designed from the start, it may take slightly longer to produce. The benefit however is that each variation, each version, will be easier to manage. Changes will be easier, and troubleshooting will be more efficient.
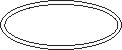
A problem that I find to be relatively common is outlines. In keeping with the continuity with previous articles, I will use an ellipse to illustrate this principle. This was not deliberate until now, it just occurred to me that I have been doing everything with ellipses. Somewhere there is probably some psychological explanation for that.

Normal View |
Wireframe 1 |
Wireframe 2 |
The Normal view above shows the ellipse the way it should look. In Wireframe 1, it has only a thin outline, while in Wireframe 2 it looks like the Normal view without the color. So what is the difference here? They are all the same graphic, but produced two different ways.
The usual procedure to create a graphic like this is to merely add an outline and choose your thickness and color. That is exactly what the first example is. In Wireframe view, you do not see this outline. If you had to produce a sign with this graphic, the sign cutting equipment would not see the outline either (oops). I have seen enough designs mistranslate outlines to say that they pose a definite problem.
In Wireframe 2, a different technique was used. It is called a Contour. Here is how to do it:
Select the object, choose a fill color if it does not already have one, and make sure your graphic has no outlines. There is an icon in your default toolbox for this that looks like the tip of a fountain pen. When you hold the mouse button on it for a second, your flyout will look like the one below:
![]()
After eliminating the outline, deselect the object. You will need to use the techniques described in my first article to access the Contour command icon. Select Tools from the menu bar, then Options, or use the double checkmark icon if you added it.
Under Workspace, choose Customize, then Toolbars, look for the Effects folder in the Commands window and select it. You should be seeing same thing I have above. Drag the Contour icon to one of your toolbars. I would suggest placing the icons on your Standard toolbar at the top of the screen. While in this Options box, I also recommend placing the icons for Envelope and Extrude on your Standard toolbar.
Click OK to close the Options box.
Now with your graphic selected, click on the Contour icon. The Contour Docker will appear on the right side and the fun begins. Your Property Bar will automatically display the tools you need to simplify your work. Play around with this to see the different effects you can create. You can control color, contour thickness (Offset), number of steps, and more. The Apply button will give you a live preview, and you can make changes until the desired look is achieved.
As long as you are now experiencing the Dockers, in this case the Contour Docker, notice how it has a minimal effect on reducing your work area. It easily collapses using the double arrows in the upper left corner, or you can close it with the X icon. You can also drag it out to your Workspace if you want to and still collapse it out of your way. This behavior in Corel predates Macromedia copying it in their MX versions by about 3 years. Go ahead and play with it, this adds a lot of productivity to your work flow.
When finished, go to Wireframe view and it should look like the Wireframe 2 above (as long as you select Outside Contour, set Steps to 1, and use a moderate offset).
There should be a Separate ![]() icon on your Property Bar. If you need to work with the original object and the Contour separately, click on this icon to "Separate" the object from the contour. If the icon is not there, you can access the command from Arrange on the Menu bar, then choose Separate.
icon on your Property Bar. If you need to work with the original object and the Contour separately, click on this icon to "Separate" the object from the contour. If the icon is not there, you can access the command from Arrange on the Menu bar, then choose Separate.
HINT: If you will be resizing your contoured object, I highly recommend using the Separate command noted above. After separating, and with the object and its contour still selected, you may want to Group (Arrange menu, then Group) to keep them together. Now if you resize the object and its contour, everything will stay proportionate. Otherwise, your contour will appear smaller as the object is made bigger, and bigger if the object is made smaller.
Once the object and the Contour are Separated, you can let your creativity go wild. With Node Editing, which I will cover in another article, you can distort either object so it is no longer a perfect contour. To me, Corel is far superior to everyone else in the way it handles Node Editing. Once you get used to the simplicity of Corel, you may very well curse their competition for the clumsiness in the way they handle tasks that are easy in Corel.
You can use commands like Combine (discussed in the previous article), which in the case of the ellipse example here, would create a hollow center in the larger ellipse. It is a good idea to "Duplicate" your objects before doing this. See below for time saving techniques in working with duplicates.
The real value of Contours shows up when you have more complex graphics. Let's say you have a group of 50 objects and 10 of them have outlines. I hope you know about the "Scale with Image" option and remembered to use it on every one of them. If not, every time you resize the graphic, it will look different. This is a time consuming problem to fix, and Contouring not only solves that problem (see HINT above), it is much friendlier when it comes to file sharing.
If you are not already aware of these shortcuts, they can streamline your work:
When you duplicate a graphic, you can use the Plus (+) key from your Numeric keypad (the one to the far right for desktop keyboards which is often more hidden on laptops), or you can use the Ctrl+D keys (same as using the Edit, then Duplicate command from the Menu bar). See the notes below for the differences in these methods of duplicating objects.
Suppose you want to create a series of duplicates all equally spaced. Use the Ctrl+D and drag the first duplicate into the position you want. Now each time you use the Ctrl+D keys, a duplicate will be created the same distance and angle as the first one.
If you use the + key to duplicate, it will create the duplicate on top of the original and you can place it wherever you want. If you use the + key to create another duplicate, it will again be on top of the object you are duplicating so you can drag it to any desired position. NOTE: This only works from the + key on the Numeric keypad, it does not work with the + key above the = sign on the main keypad.
If you use the Ctrl key while dragging an object, it will constrain the dragging to a straight line. You can only drag in one direction so the duplicate stays in line with the original position.
You can use the arrow keys to Nudge an object. This is useful if you will want to move it back into its original position again, or move it a set distance (see next point).
With no objects selected, your Property Bar should have settings to control your offsets. The Duplicate Offset controls whether a duplicate sits perfectly on top of the original (both x and y set to 0), or whether it shifts off of the original (the default setting is .25" for both x and y). The Nudge Offset controls the distance an object moves each time you press an arrow key. By default, using the Shift key with an arrow will double the distance an object moves, and using the Ctrl key with an arrow will reduce the nudge distance to half.
If these Offset controls are not already on the Property Bar, then make sure you have no objects selected, and use the techniques from my first article to put them there. The Offset controls are in Options folder which is inside the Tools folder. This might sound a little confusing since there is a Tools folder inside the Options folder, and these are inside the Options dialog box under the Tools menu. See below:
To avoid having this article too long, I am only going to introduce you to these "friends" right now, but in the future, we will be getting better acquainted with them.
With two or more objects selected (the Separated ellipse objects created earlier will do, or you can just create a couple random objects), open the Options dialog box. Under Workspace in the left pane, expand Customize and click on Toolbars. Look for the Arrange folder in the Commands window and click the + next to it. Now click on the Grouping/Combining folder. If the following icons are not already on your Property Bar, put them there. Note that it should say "Multiple Objects" in the Property Bars window. See below.
These are the icons you will want to drag to your Property Bar:
Combine. This was discussed in my previous article. You may also want to include the Group, Ungroup, and Ungroup All commands. Personally, I recommend them.
Break Apart. Basically the opposite of Combine.
Separate. This one was described above and Break Apart replaces all of its functions in newer versions.
Convert to Curves. Converts text to curves and allows standard objects, such as rectangles, to be altered.
Intersect. Creates a new object out of the intersection between objects.
Weld. Converts multiple objects into one and eliminates seams.
Trim. Uses one object to knock out its shape into another.
After placing these icons on your Property bar, click the OK button in the Options dialog box.
In the next article, I will be providing some examples of how these commands will help you master good file creation. In the meantime, the introduction to having them will provide you with enough information to brainstorm some of their usefulness.
In your experimentation, remember to use Wireframe view. Use the Duplicate and Nudge features to see how each of these work. Create different objects, overlap them slightly, select each object one at a time and use the new command icons. Change the order you select the objects in and see how it effects the way the command works.
Here is a specific exercise. Type a few words, or a sentence, using a connecting script such as Brush Script. Now zoom in on the text. Looks great, right? Try Wireframe. See how the letters are overlapping? Now, while still in Wireframe, and with the text selected, click on the Weld command. See the difference? If you are only looking at it on a computer screen, you might say, "No big deal." But to a sign company, this is a very big deal!
Between your creative experimentation and the information in these articles, you will be able to solve problems with nuisance clip art and junk files that someone gives you, but most importantly, you will be able design files that are not prone to problems. With a little planning, you can make your job easier whenever you need to modify or share a graphic.
Next.. How To Use Your Friends.
Steve Chittenden owns and operates Creative Business Services which provides web design, graphic design, writing, and marketing services. If you have a web site that could benefit from this CorelDRAW 9 material, please feel free to link to these pages.