
Notice:This article is most ideal if you are using CorelDRAW 11, 12, X3, or higher. Those using older versions like CorelDRAW 9 or 10 will find my archived version of this article much better. |
Let's do a simple project to reinforce how this all works. It is best if you have read the previous articles in this series, because this article will provide a hands-on approach to help you better retain what was covered so far. We will do what the program was designed to do, and what the name implies; get ready to DRAW! I'll show you a few techniques to enhance even a simple design, and delve into tool functionality that is beyond the ordinary to spark your creativity.
This is your road map, follow it carefully as you explore unfamiliar territory. Soon, you will know your way around. But for now, read the map so you will not have to stop and ask for directions. Shift into first gear to feel the raw power. Let the top down and feel the wind in your hair as we take this tour. For lack of a better way of saying it, this is the point where the rubber meets the road.
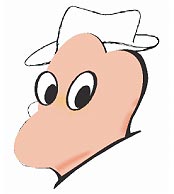
To illustrate that you don't have to sweat on your images, I created a quick sketch that is anything but perfect, but watch what happens as we progress through this project.
Download this graphic and follow the instructions below.
The graphic will open in a new window. Right click, then choose Copy.
Open a New CorelDRAW document, then choose Edit from the Menu bar, then Paste (or Ctrl+V).
Depending on your browser settings, the image size might be huge using this copy and paste technique. The height should be about 3 inches. If it is too big, use the settings on the Property Bar to reduce the image down to about 3 inches high. If it does not reduce proportionately (i.e. gets squashed into pancake shape), set the width to about 2.5 inches. NOTE: The tiny lock icon on the Property Bar will turn the “constraining” of object proportions on and off.
Next, open the Object Manager like we covered in the previous article.
Click on Layer 1 under Page 1 in the Object Manager (if Page 1 has a + sign next to it, click on that to reveal the properties of Page 1). With Layer 1 highlighted, click again, but do not double-click. Now type sketch and then press the Enter key.
Now click on the ![]() New Layer icon at bottom of the Object Manager and type head then press the Enter key.
New Layer icon at bottom of the Object Manager and type head then press the Enter key.
Repeat Step 6 above adding the following layers in the order listed (each layer will add above the previous layer, so the order I am listing is from the bottom up after you are done): face, eyes, nose, mouth, ear, hat. It will now look like the screen below which you can zoom in on for a better view. If you can't see the enlargement viewer below, hover here for image showing layers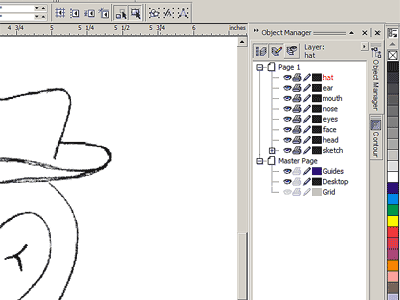 .
.
|
|
One of the secrets to mastering a drawing is to identify your basic shapes. This sketch deliberately has ovals in it to keep this project a lot easier than it looks. Let's start drawing.
In the Object Manager, click the pencil icon on the sketch layer to prevent it from being selected or accidentally moved. Click on the head layer to activate it.
The next part will take some practice, don't worry about perfection, just try to get used to the techniques. I am showing the outlines in red below, so you can see how it works.


I started by drawing a simple ellipse. When you click a second time after selecting the ellipse (do not double-click), you get a bunch of arrows. The corner arrows rotate the object, and the middle ones on all four sides skew it. The only way to get better with these is to practice. When you click again, you can go back to the sizing handles, and you can go back and forth as needed to edit the object. Keep adjusting the proportions, rotation, and skewing to get the face like the middle shown above. By using the ellipse, you get a nice smooth flowing line, so this is a good technique to master. Next, on the far right above, I created a couple duplicates of the ellipse, rotated and skewed them as needed, then hand drew the neck using the Bezier Tool like we did in the previous article.
You probably think this looks awful, but that does not matter right now. Select all the objects you just created on the head layer, then click the Weld icon if you have it, otherwise, Arrange from the Menu bar, then Shaping, then Weld. Now you can fill with a flesh color (Faded Pink on the Standard color palette) and remove the outline if you have one.
Choose the ![]() Transparency Tool while the head is still selected. On the Property Bar, set the Transparency Type to Uniform and the Starting Transparency amount to 25. This will allow you to see the sketch underneath, and we will remove this transparency later.
Transparency Tool while the head is still selected. On the Property Bar, set the Transparency Type to Uniform and the Starting Transparency amount to 25. This will allow you to see the sketch underneath, and we will remove this transparency later.
Now we will use the ![]() Mesh Tool which should be in the same flyout as your Interactive Fill Tool. Make sure the head object is still selected. Whoa! What's all that weird grid pattern you're seeing now?
Mesh Tool which should be in the same flyout as your Interactive Fill Tool. Make sure the head object is still selected. Whoa! What's all that weird grid pattern you're seeing now?
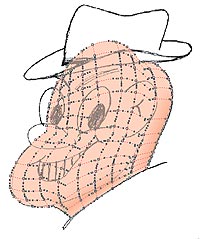 Look on your Property Bar. By default, the Grid Size will be 3 for both horizontal and vertical grid. Change the top (horizontal) number to 8, and the bottom (vertical) number to 12. The Selection Mode will be set to Rectangular by default. Change that to Freehand.
This Freehand Selection Mode will allow you to select some of the nodes under the jaw and the lower right outside edge of the back of the head by encircling the nodes you want to select (use the Shift key to make multiple selections). Once those nodes are selected choose a shadow color such as Soft Pink or Peach.
Click outside the mesh area to deselect the nodes, then select a few nodes on the cheek bone and between the lower part of the eyes. Choose a light color such as Sand to create a highlight. Feel free to experiment with the Mesh Tool, and don't worry that it may seem awkward at first. I just wanted to give you a simple exercise so you can realize some of the potential of this powerful tool. It is a great way to provide shading and dimension, and it can create stunning graphic effects.
Now click on the pencil icon for the head layer in the Object Manager to lock it, and then click on the face layer to select that layer. Using the same technique we started with on the head, create the oval for the jaw and chin until it matches the one on the head layer. Recreating this is great practice, and the head layer is now locked to avoid being accidentally changed.


On the Property Bar, there is an ![]() Arc icon and you can set Starting and Ending values next to that (with the ellipse still selected). The values, as shown on the far left above, should be around 95 and 350 degrees. Once that is done, Convert to Curves (Ctrl+Q).
Arc icon and you can set Starting and Ending values next to that (with the ellipse still selected). The values, as shown on the far left above, should be around 95 and 350 degrees. Once that is done, Convert to Curves (Ctrl+Q).
Choose the ![]() Bezier Tool with the arc/ellipse still selected to begin creating what is shown in the middle above. Begin on one of the open end points in the arc/ellipse, click a point at each end of the cheek bone line under the eye, then click the other open end in the arc/ellipse. This will close the ellipse.
Bezier Tool with the arc/ellipse still selected to begin creating what is shown in the middle above. Begin on one of the open end points in the arc/ellipse, click a point at each end of the cheek bone line under the eye, then click the other open end in the arc/ellipse. This will close the ellipse.
Select the nodes at both points which used to be the ends of the arc/ellipse, and also select the two nodes in between you just added on the cheek bone. On the Property Bar, use the Curve icon to make sure they are all curves (no straight lines), and set them to Cusp using the Cusp icon. Click inside the object to deselect the nodes and use node editing like we covered in the previous article to fine tune the shape until it looks like the middle image above.
Practice with the Mesh Tool to get some shading effects like the far right image above. There is no need to add transparency this time. Also add the black line for the cheek bone to this face layer using either the Bezier or the Freehand Tool and node editing techniques.
In the Object Manager, click the eye icon on the face layer so it becomes invisible, then click on the eyes layer. It should seem apparent that the Ellipse Tool will be best to create the eyes, even though we don't want perfect ellipses.
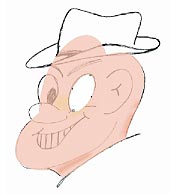 To begin, create an ellipse in the basic shape of the outside of the eye. Use rotating and skewing to get the right look. Make it slightly smaller than the drawing, fill it with white, and remove any outline outline as shown as shown here on the right. Now Convert to Curves (Ctrl+Q). OK, so right now, it looks like Colonel Klink. Duplicate this object (Ctrl+D), reduce it to pupil size, and fill it with black to create the pupil. Once you get the pupil sized, skewed and positioned correctly, select the white again. If you still have a Contour Docker on the right, click on the tab to display it. Otherwise use the Window menu, then Dockers, then choose Contour.
Contour the white eye using the following settings: Outside contour using the radio buttons, .025 in. Offset, and Steps set to 1. At the top of the Contour Docker, select the center icon for Contour Color, and set both color selectors to Black. Click the Apply button.
After contouring, click the ![]() Break Apart icon on the Property Bar if you have it. Otherwise, select Arrange from the Menu bar, then choose Break Contour Group Apart.
Break Apart icon on the Property Bar if you have it. Otherwise, select Arrange from the Menu bar, then choose Break Contour Group Apart.
 Next, click off the objects to deselect everything, then select just the black contour. Use node editing, resizing, and maybe skewing to create a non-uniform, irregular outline as shown to the right.
Before we go any further, I want to show you something else. Click on the Object Manager tab in the Dockers, then click the eye icon next to the face layer to make it visible again. The eye is over the cheek bone. Doh! I wanted to demonstrate another easy management feature with layers. Click and begin dragging down on the eyes layer in the Object Manager. You will see an I-beam appear as you drag the layer. When that I-beam is underneath the face layer, release the mouse button. Now the cheek bone covers the eye like it should because the eyes layer is below the face layer. Click the eye icon for the face layer to make it invisible again.
Select just the white of the eye and the black contour making sure the eyes layer is active on the Object Manager. Now Duplicate the selection (Ctrl+D). Use the left arrow key to nudge the duplicates into the approximate location of the other eye.
Click the ![]() Mirror Horizontal button on the Property Bar (the top one of the two buttons here). Then begin resizing, rotating, and skewing until the object looks right. HINT: Wireframe view will help on this step. Don't worry that the eye covers the nose. The nose layer is above the eyes layer for this reason. Also Duplicate the pupil from the first eye, drag the duplicate over to the second eye, and make the changes needed until it looks right.
Mirror Horizontal button on the Property Bar (the top one of the two buttons here). Then begin resizing, rotating, and skewing until the object looks right. HINT: Wireframe view will help on this step. Don't worry that the eye covers the nose. The nose layer is above the eyes layer for this reason. Also Duplicate the pupil from the first eye, drag the duplicate over to the second eye, and make the changes needed until it looks right.
Click on the pencil icon for the head layer in the Object Manager to unlock it so the layer can be edited, then select the head layer. Select the head object, choose the Transparency Tool from the toolbar, and set the Transparency Type to on the Property Bar None. Strange looking critter now, isn't it?
Now Duplicate the head object, then use the To Back icon on your Property Bar if you have one showing (otherwise Arrange from the Menu bar, then Order, then To Back). Select the Mesh Tool, click the Clear Mesh icon on the Property Bar, and press the Space Bar on the keyboard to revert back to your Pick Tool. Fill the duplicated object with Black and drag the center sizing handle on the right side out just a little so you can see the black object.
 Use node editing techniques to create a non-uniform outline, but you only need to do the back of the head, collar, and neck area as shown here on the right. The face layer will have its own outline, and so will the other objects.
Now that we have covered the basic techniques, make the head layer invisible and begin creating the objects on the remaining layers. Each layer will use the drawing methods, stacking order, and non-uniform outline (contouring) techniques covered here so the finished drawing will have the look we want. You can add anything you want for more effects too. You could add color to the eyes, highlights, or any other detail. Below you will find a few tips to arrive at the completed drawing as well as a sample and file you can download so you can examine it closer.
You can create objects for shading and apply transparency to the color to create the shading effect. Fountain transparencies can create nice effects too. Be sure to experiment with the Interactive Tools too, because these are some powerful features of CorelDRAW.
Don't forget about Distortions. I duplicated the pupils, filled them with a light color, applied a swirl distortion, then used sizing, rotating, and skewing to get the effect I wanted.
Don't just create lines. For the eyebrows, I used the Bezier Tool to create more custom shapes.
In versions at least back to CorelDRAW 11, you can start with an outline or line, and convert that line or outline to an object so it can be manipulated using node editing. To do this, the Convert Outline To Object command is located in the Arrange menu. You will want to be sure to delete your original line or outline, which is best done using Wireframe view.
For the shaded area on the rim of the hat, I created the shape, filled it with black, applied a 50% transparency with the Transparency Tool, and then duplicated the object. I removed the transparency from the duplicate and changed the fill to white. Next, I applied a black contour to the white duplicate and used the Break Apart command. Then I selected just the black contour and adjusted it for the non-uniform outline look I wanted. After that, I selected the white again, and while holding the Shift key, selected the revised contour, and then Combined them. This knocks out the white and reveals the semi-transparent 50% black that darkens the blue hat color. Remember from previous lessons, the order you select the objects in before combining matters.
For the teeth, they are easy if you create rectangles, then Convert to Curves so they can be reshaped.
For simplicity, I used the Standard color palette, but you could get even more effects using the PMS palette which has many more color choices. You can also use RGB or CMYK Mixers to create your own colors. Just be aware that RGB renders colors that do not print accurately.

Download the finished CorelDRAW file
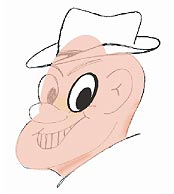
Well there you have it. He may not be the most handsome fellow you ever met, but that's actually quite deliberate. This design has carefully chosen elements that make a great practice exercise. We also did not bother to clean up messy design methods like we did with the coffee beans either. The idea here was just to practice a good variety of useful drawing techniques without making it too complicated.
Before we move on, let me outline a few more secrets to help you use CorelDRAW more effectively. Some of this functionality is exclusive innovation available only in CorelDRAW. So the next time someone claims that CorelDRAW is not a serious design tool, you can smile knowing how wrong they are. What's really amazing is that CorelDRAW had much of the capability outlined below back in the 1990's. In fact, all the articles up to this point were originally written for CorelDRAW 9 released in 1999. Those articles are now archived, but still available.
Did you know you can rotate guidelines to any angle? To the best of my knowledge, Corel is the ONLY program with this feature. To do this, click on the guideline (make sure it's not locked), then click a second time (not a double-click). You will see a center point and two sets of arrows. If you position your cursor over the arrows, it rotates the guide around the center point. The center point can also be moved, which is great for things like setting up a vanishing point for perspective. Each time you duplicate a guideline, it will have the same center point as the one you are duplicating. If you place your cursor over a rotated guideline, you will get a four-pointed arrow cursor, and you can move the entire line in any direction. Also take note of all the options on the Property Bar, including the option to set precise values of angle and position.
Make sure you are aware of the options available from the Outline Pen Dialog (available from the toolbox or the F12 key). The checkboxes for Behind Fill and Scale With Image are very useful. The Behind Fill option places the outline behind the fill color which is especially nice with fine details and fonts when you are adding outlines. The Scale With Image allows you to resize your image and the outline will adjust with it. Click on the Edit Style button and you can customize an outline any way you need it, plus you can save it for future use. There are several default line styles already included too.
Have you ever had a design where you are performing a series of steps to several objects and wished you could automate the process? You can. On the Menu bar, choose Tools, then Visual Basic, then Record. You will get a dialog box so you can name your Macro (recorded series of steps), and select where you want it saved. Simply begin performing the operations you want to record, then stop recording using Tools, then Visual Basic, then Stop. You can “play” your recorded steps using the command in the Tools menu, or add a Play button to one of your toolbars.
Under the Edit menu is an option called Insert New Object. This is very useful if you want to link an outside file. One example would be a spreadsheet. You can design all the graphics for the page and insert the spreadsheet using this option. Whenever you open the source file for the spreadsheet and update it, the changes will occur automatically in your CorelDRAW document. You can also double-click on an inserted file to open it in its native program to make any changes. In the next article, I will show you a very practical example of CorelDRAW power that Adobe doesn't offer.
The ![]() Shape Tool we used in the last article has some functionality you may not yet be familiar with. With text selected, you can adjust the space between all letters by pulling on the lower right handle. If there are multiple lines, the lower left handle will adjust the line spacing. Each letter has a node that can be individually selected to move only the letter(s) you want to move. Don't forget you can constrain with the Ctrl key when multiple nodes are selected. If you are working with a bitmap, you can use the Shape Tool to crop the bitmap, and you also have every feature of node editing available as well. After you crop a bitmap, the Crop Bitmap icon on the Property bar applies the changes permanently (eliminates everything you cropped out), and reduces the file size in most cases. Note that version X3 added a Crop Tool to simplify cropping and it works with both bitmap and vector objects.
Shape Tool we used in the last article has some functionality you may not yet be familiar with. With text selected, you can adjust the space between all letters by pulling on the lower right handle. If there are multiple lines, the lower left handle will adjust the line spacing. Each letter has a node that can be individually selected to move only the letter(s) you want to move. Don't forget you can constrain with the Ctrl key when multiple nodes are selected. If you are working with a bitmap, you can use the Shape Tool to crop the bitmap, and you also have every feature of node editing available as well. After you crop a bitmap, the Crop Bitmap icon on the Property bar applies the changes permanently (eliminates everything you cropped out), and reduces the file size in most cases. Note that version X3 added a Crop Tool to simplify cropping and it works with both bitmap and vector objects.
Make sure to explore the Toolbox. Use the Help files to find out more about anything you are not familiar with. Search the Corel site for tips, techniques, and articles. Once you know the terms, you can search the Internet for a wealth of information. Every tool can and does have several articles written about it. You will be amazed at what you can do with Corel, so explore...
This was the final article in my original CorelDRAW series, but whenever people find out about a little known function I find very useful, they get excited about it. The next article shows you a powerful feature of CorelDRAW that Illustrator can't touch.
Next.. Kids, Don't Try This in a Clay Hut
Steve Chittenden owns and operates Creative Business Services which provides web design, graphic design, writing, and marketing services. If you have a web site that could benefit from this CorelDRAW material, please feel free to link to these pages.